

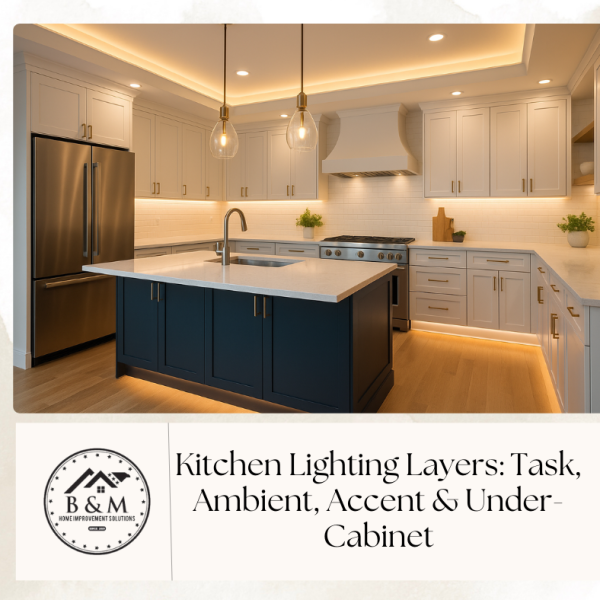
Kitchen Lighting Layers: Task, Ambient, Accent & Under-Cabinet (Lancaster & York, PA)
If your kitchen is the heart of your home, lighting is its heartbeat—setting the rhythm for everything from weekday breakfasts to weekend gatherings. In Lancaster and York, PA, many kitchens we redesign look beautiful during the day but fall flat at night because the lighting isn’t layered, zoned, or specified correctly. This guide explains the four essential layers—task, ambient, accent, and under-cabinet—and how to integrate them with your cabinetry, backsplash, and countertops for a space that’s both functional and stunning.
Why Lighting Layers Matter More Than a Single Fixture
Relying on one center ceiling fixture creates shadows, glare, and uneven illumination—especially on worktops where you actually prep food. Layering solves that by distributing light at the right intensity, angle, and color for each task and mood.
A properly layered plan:
Eliminates shadows on counters and in corners.
Reduces eye strain and improves color clarity for cooking.
Creates zones so the kitchen feels lively when entertaining and calm when winding down.
Highlights the investments you’ve made in cabinetry, backsplash, and countertops.
Pro tip: Always think of lighting as part of the design package—not an afterthought. The earlier we coordinate with your cabinetry and backsplash plan, the better your results.
The Four Layers—Explained and Engineered
1) Task Lighting: Bright, Glare-Free Light Exactly Where You Work
Purpose: Illuminate work surfaces (counters, island prep zones, sink, range).
Typical sources: Under-cabinet LED bars/strips, recessed downlights over counters and the sink, pendants over the island.
What makes task lighting “good”?
Beam placement: Avoid downlights directly over your head; aim the beam toward the counter’s front edge to keep your body from casting shadows.
Uniform coverage: Choose continuous under-cabinet bars (not just pucks) to avoid scallops and dark gaps.
Output: Start with 300–500 lumens per linear foot for under-cabinet lighting; adjust for counter color (darker tops often need more output).
Dimming: Always dim. You’ll want high output for chopping and lower levels for a midnight snack.
Integration tip: When planning two-tone cabinetry, match your task-light hardware finish (trim rings, pendant canopies) to the upper cabinet finish or your fixture finish palette.
2) Ambient Lighting: Fill the Room with Comfortable, Even Light
Purpose: General illumination that makes the kitchen feel open and welcoming.
Typical sources: Recessed downlights (wide beam), a central flush/semi-flush fixture, cove lighting at the ceiling, or a layer of toe-kick lighting reflected off the floor for subtle glow.
What makes ambient lighting “good”?
Spacing & beam angle: For 8–10 ft ceilings, start with a downlight grid spaced roughly 4–6 ft apart using wide beam distribution.
Ceiling height matters: Taller ceilings benefit from a combination of recessed and decorative fixtures to avoid dark “caves” above eye level.
Wall color & reflectance: Lighter paint and higher-reflectance surfaces boost ambient effect without increasing energy use.
Integration tip: If your backsplash is full-height and reflective (gloss tile, full-slab stone), you can utilize softer ambient levels because surfaces bounce more light.
3) Accent Lighting: Drama, Depth, and Design Details
Purpose: Highlight architectural features and materials (open shelves, glass-front cabinets, ribbed tile, stone veining, wood grain).
Typical sources:
In-cabinet lighting: Micro linear strips on the interior stiles or at the shelf front.
Above-cabinet uplighting: LED tape or bars that graze the ceiling and add height.
Wall grazing: Narrow-beam lights that reveal texture (think hand-molded tile).
What makes accent lighting “good”?
Grazing vs. washing: Grazing (light close to the surface) emphasizes texture. Washing (light farther out) softens it. Choose based on your material.
Controlled levels: Accent should be lower output than task—aim for a 3:1 or 5:1 contrast between focal points and general light.
Color continuity: Keep accent lighting the same Kelvin and CRI family as the rest of the kitchen so materials read true from every angle.
Integration tip: If your countertop has bold veining or a waterfall edge, consider a narrow, angled downlight that reveals movement in the stone. For help selecting surfaces, see our Countertop Guide for Lancaster & York.
4) Under-Cabinet (and Toe-Kick) Lighting: The Workhorse—and the Mood Setter
Under-cabinet is technically task lighting, but it also sets ambiance when dimmed. Toe-kick lighting adds a soft floor glow for evening and overnight navigation.
Spec notes that matter:
Continuous bars over pucks: Bars give even light with fewer scallops.
Diffusion: A frosted lens reduces diode “dots” on glossy counters and backsplashes.
Color consistency: Use the same Kelvin and CRI as task and ambient layers.
Clean install: Hidden wiring channels, recessed channels in cabinet bottoms, and factory notching ensure a tidy, long-lasting finish.
Toe-kick lighting done right:
Install LED channels behind a low-profile diffuser at the cabinet base.
Tie to a separate dimmer or scene. A night-light scene at 5–10% looks upscale and is surprisingly practical.
Kelvin, CRI & Why Your Photos (and Food) Might Look “Off”
Understanding Kelvin (Color Temperature)
2700K: Warm, cozy. Great for dining areas and historic homes.
3000K: Warm-neutral. Our go-to for most Lancaster & York kitchens—inviting without yellowing whites.
3500K–4000K: Neutral-cool. Crisp, modern, can skew blue on warmer palettes.
Rule of thumb: Choose one Kelvin family for the kitchen and stick to it across all layers. Mixing 2700K pendants with 4000K under-cabinet creates visual noise.
CRI (Color Rendering Index)
CRI 90+ is our standard; 95+ when accurate color is critical (selecting produce, seeing true finishes).
Low CRI can turn your beautiful backsplash muddy, your walnut cabinets flat, and your pasta sauce gray.
Zoning: Control the Kitchen by Area and Activity
Zoning divides your lighting into controllable groups:
Island pendants on one switch/dimmer.
Perimeter under-cabinet on another.
General recessed on a third.
Accent/in-cabinet on a fourth.
Toe-kick/night light on a fifth (often low-voltage, dimmable).
With zoning, you can create scenes (e.g., Cooking, Dining, Entertaining, Night) so the kitchen adapts with one tap. If you entertain often, scene control is a quiet luxury you’ll appreciate daily.
Dimmers: Small Investment, Big Impact
Every lighting zone should be dimmable. Benefits:
Mood control: Dial up for prep, down for dinner.
Glare reduction: Especially helpful on glossy tiles and polished stone.
Energy & lamp life: LEDs last longer when not run at full power.
Compatibility check: Use ELV or 0–10V dimmers matched to your driver/transformer. We verify dimmer-driver compatibility in the design phase to prevent flicker or dropout.
Pendants Over the Island: Scale, Spacing, and Sightlines
Count & size:
5–6 ft island: two 10–12″ pendants or one 18–20″.
7–8 ft island: two 12–16″ pendants or three smaller 8–10″.
9+ ft island: three 10–14″ pendants or two statement fixtures.
Height: 30–36″ above the countertop (adjust for tall users/sightlines).
Spacing: Evenly spaced with visual “weight” balanced against cabinetry and hood.
Finish strategy: Coordinate pendant finishes with cabinet hardware and faucet. In a two-tone design, pendants can bridge the palette.
Recessed Downlights: Size, Trim, and Placement
Size: 4″ is versatile; 2″ and 3″ architectural trims create a finer, modern look.
Trim & beam: Use wide floods for ambient; narrow floods for accent or targeted zones.
Placement:
Over counters: center the beam at the front third of the countertop.
Avoid placing directly behind where you stand to prevent shadows.
Keep cans off the crown line to avoid scallops on upper cabinets.
Ceiling color & reflectance influence perceived brightness. A crisp white ceiling gains you “free” light—something to consider when coordinating with your backsplash and wall palette.
Under-Cabinet Details That Separate Pro from DIY
Hardwired vs. plug-in: Hardwired is cleaner and lasts longer.
Drivers/transformers: Centralized, accessible location (e.g., in a pantry or basement joist bay).
Switching: Tie under-cabinet to a wall dimmer and/or smart keypad—not an inline toggle hidden under a cabinet.
Lens & glare: Use a frosted lens to soften diode images on polished granite or quartz.
Channel depth: Recessed aluminum channels create a built-in look and protect strips from grease and cleaning.
Accent Ideas for Materials You Love
Open shelves: Integrated LED with a rear or front reveal highlights wood grain and collectibles.
Glass uppers: Vertical stile lighting makes glassware sparkle without hot spots.
Backsplash texture: Grazing a hand-molded or ribbed tile wall adds shadow and dimension.
Waterfall ends: A narrow downlight can trace veining down the slab for drama at night.
Pantry portals & hidden doors: Concealed light lines hint at what’s beyond—functional and fun.
Planning a statement slab? Dive into our Countertop Guide for coordination strategies.
Smart Controls: Scenes, Schedules, and Voice
Scenes: Cooking (task 100%, ambient 60%), Dinner (pendants 40%, under-cabinet 30%, accent 20%), Night (toe-kick 5–10%).
Schedules: Automate toe-kick or under-cabinet as night lights.
Voice/app: Hands full? “Set kitchen to Cooking.”
Future-proofing: Choose systems that support dimming curves for LED and integrate with your broader smart home.
Common Mistakes We Fix in Lancaster & York Kitchens
Mixed color temperatures (2700K pendants + 4000K under-cabs). Result: patchy color, unflattering food and finishes.
Puck lights only under cabinets. Result: scallops and dark areas where you prep.
No dimmers. Result: blinding at night or too dim for tasks.
Poor beam aiming. Result: head shadows across counters.
No accent layer. Result: space looks flat at night, investments don’t “read.”
Forgetting toe-kick lights. Result: missed opportunity for elegant nighttime navigation.
No zoning. Result: all-on/all-off is impractical and wastes energy.
Coordinating Lighting with Cabinetry, Backsplash & Countertops
Lighting doesn’t exist in a vacuum. The best outcomes happen when we select materials and fixtures together.
Cabinet finish: Matte paints absorb more light; stained woods reflect differently depending on grain. Plan output accordingly.
Backsplash reflectance: Glossy glass or glazed ceramic bounces light; honed stone absorbs. Choose beam angles and outputs that flatter.
Countertop tone & sheen: Dark, polished tops may mirror diodes—opt for diffused under-cab bars and test samples on site.
Hardware & faucet finishes: Coordinate pendant and trim finishes with hardware for a cohesive palette (brushed nickel, matte black, living brass, etc.).
Lancaster & York Considerations: Homes, Ceilings, and Lifestyle
Historic homes (city or countryside): Lower ceilings benefit from slim architectural downlights, linear under-cab lights, and layered wall/pendant fixtures to avoid visual clutter.
Farmhouse & transitional styles: Warm 2700–3000K pairs well with natural woods and painted cabinets; consider seeded-glass pendants with high-CRI lamps to preserve warmth.
Modern new builds: 3000–3500K with small-aperture downlights and minimal trim lines delivers a clean aesthetic.
Entertaining culture: If your kitchen opens to a deck or sunroom, coordinate scenes with adjacent spaces so entertaining feels seamless.
Step-by-Step: How We Design Your Lighting Plan
Discovery: We learn how you cook, entertain, and relax. Morning coffee station? Baking zone? Bar area?
Room survey: Ceiling height, natural light, surface reflectance, existing circuits.
Material palette alignment: Cabinets, backsplash, and countertops selected—or provisional choices for light modeling.
Fixture schedule: Kelvin, CRI, outputs, beam angles, trims, and finishes.
Layout & aiming: Counter runs, island geometry, sink and range focus.
Controls & zoning: Dimmers, switches, scenes, and smart integration.
Mock-ups (as needed): On-site trials for under-cab diffusion or accent grazing.
Install & aim: Final adjustments after surfaces are in; set scenes; client orientation.
Budgeting: Where to Spend vs. Where to Save
Spend on:
Under-cabinet bars (quality, diffusion, high CRI).
Dimmers & smart controls (daily benefit).
Small-aperture architectural downlights when ceilings are low.
Accent lighting for special materials you’re investing in.
Save on:
Fewer but properly sized pendants instead of many small ones.
Standardized trims if architectural lines aren’t a priority.
Simpler toe-kick channels (the magic is in the dimming, not the fixture price).
Maintenance & Longevity
LED life: Look for rated lifetimes of 50,000 hours or more and reputable drivers.
Cleaning: Wipe lenses periodically; avoid harsh chemicals on diffusers.
Serviceability: Keep drivers accessible (not buried) and label zones inside the electrical panel.
Quick Specification Cheatsheet
Kelvin: 3000K for most Lancaster & York kitchens (or 2700K for extra warmth).
CRI: 90+ (ideally 95+ for color-critical areas).
Under-cabinet: Continuous LED bars with frosted lenses, dimmable.
Downlights: 2–4″ aperture, high-efficiency, wide flood for ambient, narrower for highlights.
Pendants: Scaled to island length; dimmable; finish-coordinated with hardware.
Toe-kick: Low-output LED strip, independent dimmer/scene.
Controls: Zone by function; add scenes (Cooking, Dining, Entertaining, Night).
Ready to See Your Kitchen in the Best Light?
Whether you’re refreshing a downtown Lancaster rowhome or opening up a York County farmhouse, we’ll design a lighting plan that feels effortless to use and beautiful to live with—layered, zoned, and tailored to your materials. If you’re planning cabinetry, backsplash, and countertop updates, bring us in early so every decision supports the lighting (and vice-versa).
Book a design consultation to start your kitchen lighting Lancaster PA plan. We’ll handle the details—so your kitchen looks and performs at its best from sunrise to last call.
Frequently Asked Questions (Lancaster & York Homeowners)
Both work. 2700K is cozy and traditional; 3000K is warm-neutral and keeps whites crisp without going blue. We default to 3000K in most projects unless you love a very warm tone.
Yes. CRI 90+ keeps finishes, foods, and skin tones from looking dull. With lower CRI, your carefully chosen backsplash or wood grain can look off.
Yes. Recessed lights often cast shadows where you stand; under-cab lights push light forward onto the counter, eliminating those shadows.
It depends on island length and pendant diameter. As a rule, two larger pendants look cleaner than three small ones on mid-size islands. Scale and spacing matter more than quantity.
Often yes. We can add channels and tie into an existing low-voltage circuit or transformer, then program a night scene.
Use dimmers compatible with your drivers (ELV/0–10V) and keep all fixtures in a zone on the same dimmer type to avoid flicker.
Not if it’s dimmed and balanced. Accent is about contrast and direction, not brute force. We keep accent levels below ambient/task so it adds depth without glare.