
Why Tiled Showers Leak (and What to Do About It)
Lancaster & York County Homeowners’ Guide from B&M Home Improvement Solutions
Introduction: Why Shower Leaks Matter
A leaking tiled shower isn’t just an annoyance — it’s one of the most common causes of hidden water damage in homes across Lancaster and York County. Even a slow drip behind your shower wall can lead to thousands of dollars in repairs, mold issues, and the eventual need to tear everything out and start over.
At B&M Home Improvement Solutions, we get calls every week from homeowners dealing with this very problem. In most cases, the leak didn’t happen overnight. It started with small installation shortcuts or missing waterproofing steps years ago, and now the water has finally found its way out.
In this guide, we’ll walk you through:
- The most common reasons tiled showers leak
- How to test and diagnose where the water is coming from
- Repair options (and when they might work)
- Why proper waterproofing systems like Schluter® are the only way to build a tiled shower that lasts
- When a full replacement is the safest option
Why Do Tiled Showers Leak?
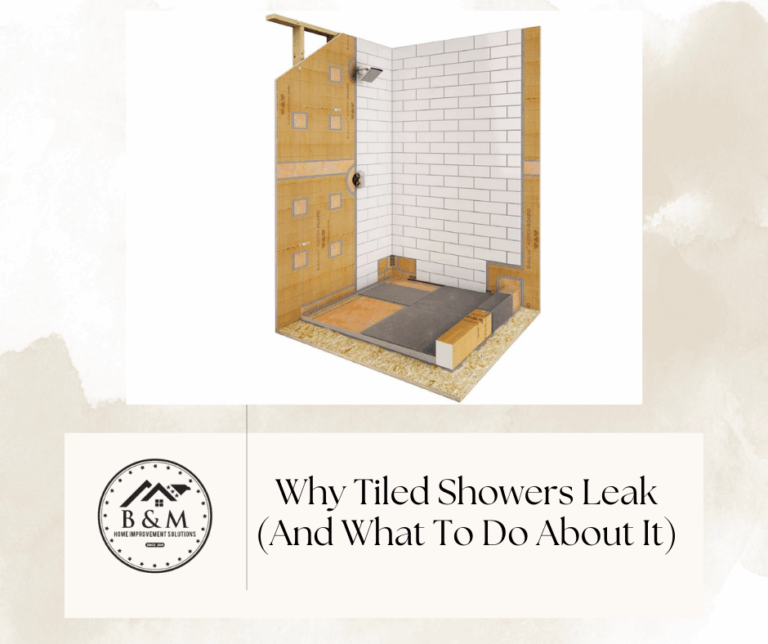
Contrary to popular belief, tile and grout are not waterproof. They are decorative finishes only. The true waterproofing happens underneath the tile. If that system is missing or improperly installed, the shower is destined to fail.
Here are the leading causes of leaks we see:
- Failed or missing waterproofing system
- No membrane or liner was installed at all, or it was punctured during tile installation.
- Improper overlap or sealing of seams, corners, or drains allowed water to bypass the system.
- No membrane or liner was installed at all, or it was punctured during tile installation.
- Cracked or deteriorated grout/caulk
- Water slips behind gaps and saturates the backer board.
- Water slips behind gaps and saturates the backer board.
- Improper substrate
- Regular drywall used instead of Moisture resistant drywall with waterproof membrane cement board or a Schluter® Kerdi Board system.
- Regular drywall used instead of Moisture resistant drywall with waterproof membrane cement board or a Schluter® Kerdi Board system.
- Shower pan or liner failure
- Old lead pans, PVC liners, or poorly sloped bases allow water to sit and migrate.
- Old lead pans, PVC liners, or poorly sloped bases allow water to sit and migrate.
- Drain assembly issues (including linear drains)
- Loose or poorly installed drains are one issue, but linear drains require even more precision.
- We’ve seen failures where a linear drain wasn’t sized to the full width of the shower entry in curbless Shower, no-threshold showers. This causes water to stall at the edges, leading to overflow and leaks into adjoining flooring.
- Improper slope toward a linear drain can also create pooling or slow drainage, which shows a slope issue during installation of the shower pan.
- The solution: if you’re building a no-threshold shower, a full-length linear drain across the entryway is essential. It must be installed as part of a complete waterproofing system, not treated as an accessory.
- Loose or poorly installed drains are one issue, but linear drains require even more precision.
- Valve or plumbing leaks
- Less common, but a faulty valve or fitting behind the wall can mimic a shower leak.
- Less common, but a faulty valve or fitting behind the wall can mimic a shower leak.
The bottom line: If the waterproofing layer fails, Depending on where we can tell there is a leak, the tiled shower is most likely compromised. If we can narrow it down to ONLY a shower pan issue it can most likely be repaired.
Preventing Shower Leaks from Day One
The best way to prevent leaks is to build the shower correctly the first time. That means following manufacturer-certified waterproofing installation methods every step of the way.
At B&M Home Improvement Solutions, we use the Schluter®-KERDI waterproofing system, which provides:
- A continuous waterproof membrane installed behind all tile surfaces.
- Fully sealed seams, corners, and transitions to drains.
- Compatibility with both standard drains and Schluter linear drains, ensuring proper slope and integration.
- A manufacturer warranty when installed according to specifications.
Why does this matter? Because if your tiled shower fails due to a product defect, Schluter will back it up. If it fails due to improper installation, you’re left with nothing but a mess. That’s why we install to the letter of the manufacturer’s guidelines — protecting you both now and in the future.
Tiles Are a Finish — Not Waterproofing
One of the biggest misconceptions in bathroom remodeling is that the tile itself keeps water out. In reality, tile and grout are only decorative finishes — the true waterproofing happens in the layer beneath. If that layer is missing, damaged, or improperly installed, the shower will eventually leak no matter how carefully the tile is laid.
Now, some tile assemblies are more resistant to water than others:
- Glazed ceramic or porcelain tile paired with epoxy grout can significantly slow water penetration. Epoxy grout is non-porous and water-resistant, while glazed tile has a sealed surface that doesn’t readily absorb moisture. In these cases, the waterproofing layer behind the tile sees far less exposure.
- Natural stone tile is a different story. Materials like marble, travertine, or limestone are porous and can absorb water, which makes a reliable waterproofing system even more critical. Without it, moisture can pass through the stone and into the wall cavity, leading to mold, staining, and eventual structural issues.
For this reason, every shower — regardless of the tile choice — needs a properly designed waterproofing plan. At B&M Home Improvement Solutions, we use Schluter® waterproofing systems to ensure that no matter what tile you select, your shower is protected at the core, not just at the surface.
How to Test for a Tiled Shower Leak (Step-by-Step)
If you suspect your shower is leaking, the key is to pinpoint the source before tearing anything apart. Showers can leak from multiple places — tile surface, drain, plumbing connections, or even faulty waterproofing behind the walls. Here’s how to narrow it down:
Visual Inspection (First Signs of Trouble)
Start with the basics. Even small clues can reveal a larger problem.
- Grout & Caulk: Check for cracked or missing grout lines, shrinking caulk around corners, or gaps where tile meets the shower floor.
- Loose or Hollow Tiles: Tap on the tiles. A hollow sound often means water has damaged the substrate behind them.
- Mold & Mildew: Look along baseboards, shower corners, and ceilings below the bathroom for discoloration or musty odors.
- Water Stains: Yellowing or soft drywall in adjacent rooms or ceilings below the shower almost always signals hidden leaks.
Pro Tip: Take photos before starting any DIY fixes — documentation helps if insurance claims are needed later.
Drain/Pan Test (Checking the Base)
Many shower leaks start at the base.
- Plug the drain with a test plug.
- Fill the shower floor with 1–2 inches of water (use a bucket, not the showerhead, to avoid splashing walls and eliminate that the faucet is or isn’t the issue).
- Mark the water level with tape and leave it for 24 hours.
- If the water level drops or you see moisture downstairs, the shower pan, slope, or drain flange has failed.
This test is especially important for older showers that used lead or PVC liners instead of modern systems like Schluter.
Water Isolation Test (Separating Surface from Structure)
This test helps determine whether the leak is from the tile surface or the deeper waterproofing system.
- Tape heavy plastic sheeting (like a drop cloth) over the walls inside the shower, sealing the edges.
- Run the shower for several minutes with the water hitting only the floor.
- If no leaks appear, the issue may be grout, caulk, or tile porosity.
- If leaks continue, the problem lies beneath — in the liner, waterproofing membrane, or plumbing.
Valve & Plumbing Check (Behind the Walls)
Sometimes leaks come not from the shower itself but from plumbing inside the wall.
- Open an access panel behind the shower if one exists.
- If there’s no panel, cut a small inspection hole in an adjacent closet or drywall area (better to patch drywall than replace an entire shower later or install an access panel for future access and eliminate drywall work).
- Turn on the shower and inspect the valve, fittings, and supply lines for drips.
Moisture Meter & Thermal Imaging (Professional Tools)
Pros often use specialized equipment to confirm hidden leaks:
- Moisture Meters detect dampness behind walls, floors, and baseboards without demolition.
- Thermal Imaging Cameras highlight temperature differences, making water intrusion visible as “cold spots.”
- Borescopes (tiny cameras on a flexible cable) can be fed through small openings to visually confirm leaks through walls.
These tools help identify leaks without the guesswork of tearing out tile prematurely.
Key Takeaway
If these tests point to surface-level issues (cracked grout, minor caulk failure), a temporary repair may help. But if the pan, drain, or waterproofing system is compromised, no amount of patchwork will stop the leak long-term. At that point, replacement is often the only responsible option.
Tile Shower Repair Options: Do They Work?
Homeowners often ask: “Can’t we just re-grout or re-caulk?”
Here’s the reality:
- Surface repairs (caulk, grout, sealers):
These can temporarily mask the problem, but they don’t fix failed waterproofing behind the wall. At best, you buy yourself a few months. - Drain replacements or valve repairs:
If the leak is isolated to a loose drain flange, faulty valve, or a mis-installed linear drain that can be corrected, targeted repairs may help. But if the waterproofing around the drain was compromised, repairs are usually short-lived. - Partial tile replacement:
Swapping out a few cracked tiles doesn’t stop water from finding the next weak point.
If your waterproofing system is compromised — especially around drains or entryways — the only lasting fix is a full replacement. If we can narrow it down to a shower pan only leaking then we can do a pan replacement. Sometimes it’s more ideal for a full replacement as we do have to remove 3 courses of tile around the entire shower, remove any doors or glass, and remove the entire shower pan. From there we install a new substrate, waterproofing system, flood test then and once it holds water for 24 hours we can drain, let dry and begin the tile install.
Why a Full Tile Shower Replacement Is Often the Only Option
Water has a way of spreading — once it gets behind tile, it saturates backer boards, studs, insulation, and subfloors. Even if you can’t see the damage, it’s usually there.
Here’s why replacement is often unavoidable:
- Mold growth behind tile can’t be cleaned without removal.
- Rotting wood or swollen subflooring compromises structure.
- Re-grouting won’t stop leaks if the waterproofing membrane is already breached.
- Drain systems (especially linear drains) that weren’t integrated properly into waterproofing can’t simply be patched. They require a reset with a complete system.
- Warranty protection is void if the original shower wasn’t installed correctly.
By rebuilding the shower with a certified waterproofing system like Schluter, you start fresh with a system that is designed and warrantied to last.
Conclusion: Do It Once, Do It Right
A leaking tiled shower is one of those problems where the cheapest solution is rarely the best. Without a properly installed waterproofing system — and proper drain integration — any tiled shower is vulnerable to failure.
At B&M Home Improvement Solutions, we believe in doing it once and doing it right. That’s why we exclusively use Schluter waterproofing systems installed to manufacturer standards, whether you choose a traditional drain or a modern linear drain. That way, your investment is protected with a real warranty.
If you’re dealing with a leak now, or you’re planning a new bathroom remodel and want to avoid the problem altogether, we’d be glad to help you make the right choice from the start.