

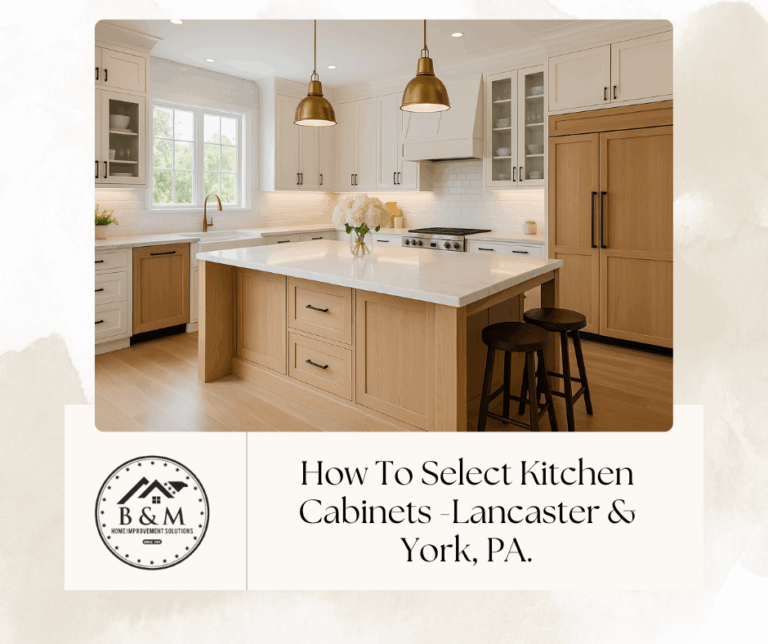
How to Select Kitchen Cabinets (Lancaster & York, PA Homeowners’ Guide)
Choosing kitchen cabinets isn’t just a style decision—it’s the backbone of how your kitchen looks, works, and wears over time. Cabinets drive layout, storage, workflow, budget, and resale value. As the design–build partner trusted by homeowners across Lancaster and York, PA, B&M Home Improvement Solutions created this comprehensive guide to help you make confident, well-informed choices—whether you’re planning a smart refresh or a full custom redesign.
Below, you’ll learn how to compare stock, RTA, semi-custom, and custom cabinets, what to look for in construction and materials, how to plan for layout and hardware, why installation quality changes everything (especially in upscale projects), and how to avoid common pitfalls. We’ll keep it local—referencing regional vendors we regularly coordinate with—and we’ll link to related guides on our site to strengthen your pillar/cluster SEO and give you a clear next step.
Start With the Big Picture: How Cabinets Shape Your Remodel
Cabinetry typically accounts for 40–50% of a kitchen budget, so the decisions you make here ripple through everything else—countertops, appliances, lighting, even flooring transitions. Great cabinets do three things at once:
Elevate function. Thoughtful interior accessories (spice pullouts, tray dividers, deep drawers, roll-outs) minimize clutter and maximize reach.
Lock in longevity. Quality boxes, doors, and finishes withstand decades of use, moisture, and cleaning.
Set the design language. Profiles, proportions, and finishes establish the room’s character—traditional, modern, or transitional.
If you’re just beginning, pair this guide with our related posts:
Cabinet Types: Stock vs. RTA vs. Semi-Custom vs. Custom
Understanding the cabinet “families” helps you set realistic expectations for cost, lead time, and design flexibility.
Stock Cabinets
What they are: Pre-sized, mass-produced, limited color/style lineups.
Pros: Fast availability, lowest upfront cost.
Typical fit: Rentals, flips, modest kitchens where speed and economy matter.
Limitations: Fewer size increments, fillers required more often, fewer interior upgrades, finishes can be thinner.
RTA (Ready-to-Assemble)
What they are: Flat-pack boxes shipped to assemble on site.
Pros: Cost savings on shipping/assembly; surprisingly solid when you choose plywood boxes and decent hardware.
Typical fit: Budget-savvy homeowners who still want plywood construction and soft-close hardware.
Cautions: Assembly quality varies; poorly assembled RTA can undercut otherwise good components.
Semi-Custom
What they are: Catalog lines with expanded sizes, door styles, finishes, and interior options. Boxes are pre-assembled; quality is generally higher than stock.
Pros: Strong value/quality balance, better finishes, broader customization, reliable warranties.
Typical fit: Most primary homes aiming for a 15–25-year kitchen with style flexibility and good storage solutions.
Custom (including Amish-built)
What they are: Built to your exact sizes, finishes, and features—no need to design around fixed sizes. Lancaster’s Amish and Mennonite shops are a major advantage locally.
Pros: Best fit and finish; heirloom-grade joinery; limitless solutions (e.g., curved islands, furniture-style hutches, integrated panels, bespoke hoods).
Typical fit: “Forever kitchens,” distinctive architecture, premium resale expectations, complex layouts.
Local coordination: We routinely collaborate with regional suppliers and mills—including Red Rose Cabinetry, Lezzer Lumber, GR Mitchell, Swartz Kitchens & Baths, Hajoca (for fixtures/hardware integration), Premier Custom Built, and Too the Trades—to spec, source, and deliver on schedule.
What Quality Looks Like: Construction Details That Matter
The difference between “nice” and “built to last” lives in the invisible parts: the box, the joinery, the hardware, and the finish system.
Box Construction (Carcass)
Plywood vs. Particleboard/MDF:
Plywood (ideally ½–¾”): stronger fastener hold, better moisture resistance, less sag.
Particleboard/MDF: economical and dimensionally consistent for doors and painted finishes, but less robust when wet.
Framed vs. Frameless (Euro):
Framed cabinets use a face frame; classic American look, easier door alignment, slightly less access opening.
Frameless (full access) eliminates the face frame; modern aesthetic, maximized interior space, requires very precise installation.
Back panels: Full-height ⅜–½” plywood backs are a premium indicator; thin stretchers alone require careful rail mounting and add risk.
Joinery & Shelf Standards
Dovetail drawer boxes (solid maple or birch) outperform stapled/glued corners.
¾” adjustable shelves resist sagging for heavy cookware.
Confirmat screws and dowels are common in frameless; quality depends on precision and density of the board.
Doors & Drawer Fronts
Solid hardwood frames with a panel (for shaker/raised) deliver timeless durability.
MDF is excellent for painted doors—no grain telegraphing; just make sure the finish system is robust.
Slab doors may be veneered over stable cores; look for matching edge-band quality and consistent grain selection.
Hardware (Hinges & Slides)
Soft-close, full-extension undermount slides (e.g., 75–100 lb rating) keep drawers smooth and quiet.
Clip-top soft-close hinges with 6-way adjustability let installers fine-tune reveals after settlement.
Integrated dampers last longer than stick-on dampers.
Finish Systems
Catalyzed conversion varnish or 2K polyurethane for superior chemical and moisture resistance.
Waterborne finishes are greener and excellent when applied in controlled shops.
UV-cured topcoats add durability and consistency.
Hand-wiped stains and multi-step glazing create depth; painted finishes should be sanded between coats with dust control to avoid nibs.
Bottom line: If you remember only one thing—plywood boxes, dovetail drawers, soft-close hardware, and a professional multi-coat finish are the foundation of a kitchen that still looks great in 15–25 years.
Style, Profiles, and Proportions: Making It Look Right
Shaker remains the most versatile and resale-friendly profile.
Inset doors (flush with the frame) communicate meticulous craftsmanship but require exacting installation.
Slab (flat) fronts suit contemporary spaces and frameless systems.
Beaded inset, raised panel, or applied molding add formality in traditional homes around Manheim Township, Lititz, and Bent Creek.
Proportion tips: Taller ceilings love full-height cabinets with stacked uppers or glass display. Standard 8-foot ceilings typically look best with 36″ uppers and a crown detail to bridge to the ceiling or leave a consistent, purposeful reveal.
Color & Finish Decisions (and What Works Locally)
Light paints (classic whites, soft creams, warm greiges) maximize light and help smaller kitchens feel open—great for older Lancaster homes with modest windows.
Two-tone (light perimeter + wood or dark island) adds depth without feeling heavy.
Rich stains (walnut, rift-sawn white oak) are resurging in upscale projects—subtle grain with furniture-grade warmth.
Satin/matte sheens hide fingerprints better than high gloss, especially on dark paints.
Pair cabinet color to your natural light, floor tone, and countertop movement. When in doubt, pull samples into the real room and check them at morning, afternoon, and evening.
Storage That Feels Custom (Even If the Boxes Aren’t)
Thoughtful accessories turn a pretty kitchen into a joyful one:
Deep drawers for pots/pans; peg systems for dish storage.
Tray dividers beside ovens; pull-out spice near the primary cook zone.
Roll-out shelves in bases for instant visibility.
Corner solutions (LeMans, Magic Corner, or super-susans) eliminate dead zones.
Appliance garages and hidden charging drawers keep surfaces clean.
Waste/recycling pull-outs with soft-close slides (ideally near the prep sink).
Toe-kick drawers for sheet pans or pet bowls in tight spaces.
We build these choices around your routines—bakers need sheet storage; entertainers want dish and glass zones; coffee lovers prioritize a bar with plumbing and dedicated power.
Layout & Clearances (Practical Rules of Thumb)
Work aisles: 42″ for one cook; 48″ for two.
Walkways: At least 36″ to move comfortably behind seating.
Counter to wall cabinet height: 18″ minimum; 21″–24″ above ranges with high-output burners.
Island size: Aim for 24″–27″ deep cabinet base (or deeper for seating), with 12″–15″ overhang for stools.
Fridge landing: 15″ of clear counter adjacent.
Microwave/Steam oven heights: Consider reach and venting; drawers or tall cabinets keep counters clear.
Well-planned clearances let your cabinets shine because everything works—no door collisions, no tight corners, no awkward reaches.
Hardware: Pulls, Knobs, and the “1/3 Rule”
Hardware is the jewelry of your kitchen. Two rules keep it refined:
Rule of Thirds (proportion): A pull length near ⅓ the drawer width looks balanced. On very wide drawers, split into two pulls or use extra-long appliance-style bars for drama.
Rule of Thirds (placement on tall doors): On tall pantry doors, centering the pull roughly ⅓ down from the top yields a natural, ergonomic grab point.
Finish mixing: Coordinated—not necessarily matched—finishes feel intentional (e.g., brushed brass hardware with matte black lighting). Choose solid metal hardware with smooth edges and sturdy posts; it’s a tactile upgrade you’ll appreciate daily.
Budgeting: What Drives Cabinet Costs (and Where to Save)
Rough ranges (installed) in our market, assuming a typical 12′×16′ kitchen:
Stock: $5,000–$10,000
RTA: $7,500–$15,000 (quality/assembly dependent)
Semi-Custom: $12,000–$25,000
Custom/Amish: $25,000–$60,000+
Cost drivers:
Door style & paint system (inset, beaded, multi-step glazes increase cost).
Box material (¾” plywood adds cost but pays back in longevity).
Height (full-height to ceiling with stacked uppers and detailed crown).
Interior accessories (roll-outs, organizers, LED lighting, powered drawers).
Panel-ready appliances and custom hoods.
Complex site conditions (out-of-plumb walls, uneven floors, tight stairways for delivery).
Finish complexity (hand-applied stains, custom color matches).
Smart savings (without regret):
Keep drawer boxes and slides top-tier; consider simpler door profiles.
Use targeted accessories where they matter most (e.g., roll-outs in the most accessed bases).
Choose a clean crown detail instead of elaborate stacked moldings if budget is tight.
Installation Quality: Why Upscale Projects Cost More to Install
Luxury results demand luxury tolerances. Here’s what adds time—and cost—but dramatically improves the outcome:
Scribing to walls/ceilings for tight, shadow-free lines.
Leveling shims and laser alignment to maintain perfect reveals across long runs.
Inset cabinetry requires micro-tolerance alignment of doors/drawers (think business-card gaps).
Panel-ready appliances (fridge/dishwasher) must align flush with adjacent doors and gables.
Custom hood enclosures, furniture bases, and feet require field fabrication and finishing.
Integrated LED under/inside cabinets needs concealed wire routing, switch planning, and dimmer compatibility.
Floor protection and dust control to keep finished spaces pristine throughout.
Premium installation is as important as premium cabinets. It’s where “nice” becomes “showpiece.”
Timeline & Logistics (What to Expect)
Design & Selections: 2–6 weeks (longer for custom color matches and stone pairings).
Lead Times: Stock (days–weeks), Semi-Custom (6–10 weeks), Custom/Amish (10–18+ weeks, depending on finish complexity and shop capacity).
Site Prep: 1–2 weeks demo and rough-in; floors and walls straightened if needed.
Set, Scribe, & Trim: 1–2+ weeks based on complexity and room size.
Counters: Template after cabinets are set; 1–3 weeks to fabricate/install.
Finals: Backsplash, hardware, lighting focus, punch list.
We manage all of this for you—design, ordering, vendor coordination, installation, and finishing—so your project hits the mark without the headaches.
Bathroom Cabinetry (Vanities & Linen Solutions)
Bathroom cabinetry lives closer to daily moisture and cleaning chemicals, so details matter:
Materials: Plywood boxes and moisture-resistant finishes are a must. MDF is fine for painted doors when the finish system is robust.
Floating vanities make small baths feel larger and ease floor cleaning.
Tall linen towers reclaim vertical storage and anchor double-vanity compositions.
Inset medicine cabinets with lighting/outlets keep counters clean.
Toe-kick heat or radiant floors near vanities improve comfort.
Sealed live-edge tops or furniture-style vanities bring luxury—ensure proper sealing and ventilation.
Pair this with our popular educational pieces:
Local Insight: Sourcing & Partnering in Lancaster–York
Your cabinet plan is only as strong as its ecosystem. We regularly coordinate with:
Red Rose Cabinetry (custom solutions and finish matching)
Lezzer Lumber (materials, panels, and millwork)
GR Mitchell (lumber, hardware, and pro services)
Swartz Kitchens & Baths (line access and accessories)
Hajoca (plumbing fixtures that integrate cleanly with cabinetry)
Premier Custom Built (bespoke cabinetry)
Too the Trades (trade resources and logistics)
Our role is to design, specify, schedule, and install—so your cabinet package, appliances, and finishes align perfectly on day one.
Maintenance & Longevity
Cleaning: Soft microfiber + mild soap; avoid abrasives and ammonia.
Environment: Stable humidity prevents panel movement and finish micro-cracks (target 35–50%).
Touch-ups: Keep a finish kit on hand; address chips early.
Hinges/Slides: Annual quick adjustments keep reveals consistent.
Well-cared-for cabinets easily deliver two decades or more of daily service.
FAQs: People Also Ask (Answered With Clarity)
What is the 1/3 rule for cabinets?
Designers use “1/3” in two helpful ways:
Hardware proportion: Choose a pull around one-third of the drawer width for balanced visuals and leverage. Very wide drawers may use two pulls or an extra-long bar.
Hardware placement on tall doors: On a tall pantry or utility door, place the pull roughly one-third down from the top for a natural reach.
Is $10,000 enough for a kitchen remodel?
For a full kitchen remodel in 2025 in Lancaster/York, $10,000 is typically below realistic budgets. However, $10k can address targeted upgrades—e.g., select RTA or stock cabinet replacement in a small galley, limited semi-custom refresh, or repaint + hardware + a few roll-outs. For semi-custom, well-appointed primary kitchens, plan $12k–$25k for cabinets alone; custom/Amish often starts $25k+.
What is the 3×4 kitchen rule?
A practical shorthand for clearances: allow 3 feet (36″) for walkways and about 4 feet (48″) for primary work aisles in multi-cook kitchens. It dovetails with the classic work triangle concept (sink–range–fridge) to prevent bottlenecks and collisions.
Should my cabinets be darker or lighter than my walls?
Lighter cabinets brighten and visually enlarge smaller or lower-light kitchens; they pair well with slightly darker, warmer wall tones for gentle contrast.
Darker cabinets add drama and can ground large, open kitchens—especially with ample natural light and light counters/backsplash to balance.
Test real swatches in your space through the day; light changes everything.
Your Next Step (And How We Help)
If you’re ready to explore options—stock, RTA, semi-custom, or custom—we’ll guide you through:
Design & Selections: Styles, finishes, interior accessories, and hardware that fit your routine.
Budget Alignment: Where to invest (boxes, drawers, slides, finish) and where to simplify.
Local Sourcing: Coordinating with trusted Lancaster–York vendors and shops.
Precision Installation: Scribing, alignment, panel-ready appliances, lighting integration, and field finishing.
Final Polish: Hardware set, door/drawer reveals, and protection plans.
Round out your research with two more deep dives:
Micro-Checklist: Choosing Cabinets With Confidence
Decide cabinet family: Stock / RTA / Semi-Custom / Custom
Specify box material (¾” plywood), drawers (dovetail), slides (soft-close undermount), hinges (soft-close, 6-way)
Choose door style and finish system (conversion varnish or 2K poly preferred)
Map critical accessories (deep drawers, roll-outs, waste pull-outs, spice, tray, corner solutions)
Confirm clearances (42–48″ work aisles; 36″ walkways; landing near appliances)
Select hardware (balanced lengths; comfortable grip; finish coordination)
Plan lighting (under-cabinet, in-cabinet, toe-kick; dimmable)
Budget for scribing, stacked uppers, panel-ready appliances, and custom hood if desired
Lock timeline: design → order → set/scribe → counters → backsplash → finals
Protect and maintain: humidity, cleaning, and annual adjustments
Final Word
Cabinets are the heart of your kitchen—and your experience in it. When you choose B&M Home Improvement Solutions, you’re choosing a single accountable partner for planning, design, sourcing, and white-glove installation. Whether you want the speed and value of semi-custom or the incomparable fit of Amish-built custom, we make sure every line, reveal, and surface feels intentional—and every dollar delivers beauty and function you’ll notice every day.
Ready to start your design session? Let’s build a kitchen that looks spectacular, works intuitively, and lasts for decades.