
Tiling a floor can transform any room, but achieving a professional-level finish requires careful planning, preparation, and execution. This comprehensive guide will take you through the entire process, from initial considerations to the finishing touches, emphasizing the use of Schluter Systems products like Schluter Ditra for underlayment and Schluter All-Set for setting material. Whether you’re an experienced DIY enthusiast or a homeowner looking to undertake your first tiling project, these steps will help ensure a beautiful, durable result.
Understanding Floor Deflection and Suitability for Tile
Deflection: Before beginning your project, it’s crucial to understand the concept of deflection. Floor deflection refers to how much a floor bends or moves under load. Excessive deflection can lead to tile and grout cracking. The Tile Council of North America (TCNA) recommends a maximum deflection of L/360 for ceramic and porcelain tile installations, where L is the span length in inches. Engineered wood and concrete substrates have different deflection standards, so assess your specific situation accordingly.
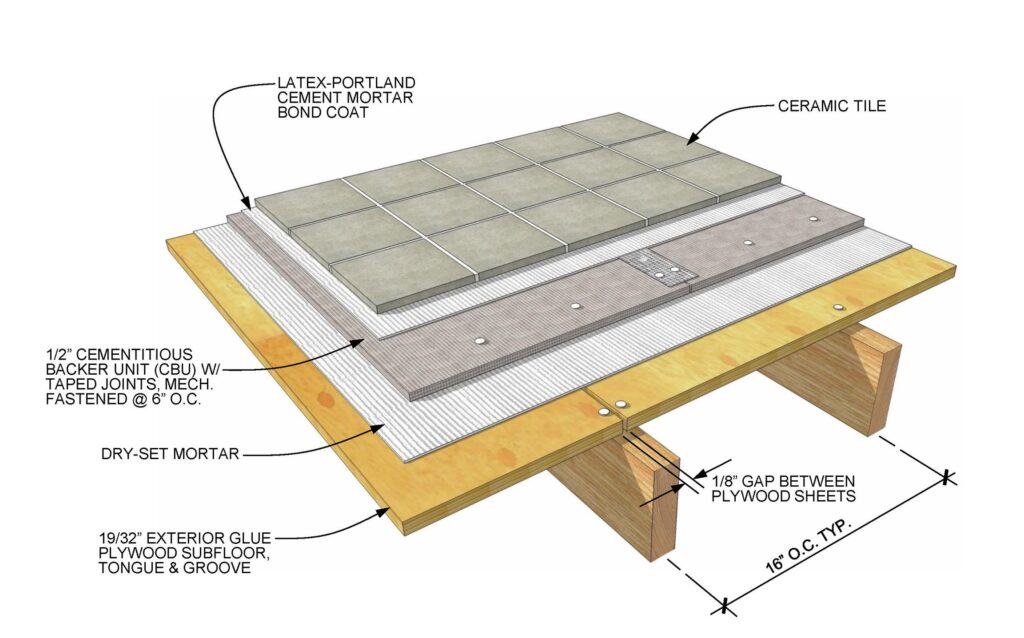
Subfloor Suitability: Ensure your subfloor is sturdy, level, and capable of supporting tile, mortar, grout, and furniture without flexing. Plywood and concrete are common subfloor materials, but each requires different preparation methods. For wooden subfloors, secure any loose areas and check for moisture or damage. For concrete, repair cracks and level any significant dips or peaks.
Types of Tiles
Your choice of tiles will significantly impact the overall look, feel, and budget of your project. Here are some common types:
– Ceramic Tiles: Made from clay and other natural materials, ceramic tiles are cost-effective and suitable for walls and light to moderate foot traffic areas.
– Porcelain Tiles: Denser and less porous than ceramic tiles, porcelain tiles are more durable and suitable for both indoor and outdoor use. They tend to be more expensive but are excellent for high-traffic areas.
– Natural Stone Tiles: Including marble, granite, slate, and travertine, natural stone offers a unique, luxurious look. However, it requires more maintenance and is typically the most expensive option.
– Glass Tiles: Often used for accents or backsplashes, glass tiles add a modern touch to any space but can be tricky to install and are on the higher end of the cost spectrum.
Budgeting for Your Project
Budgeting accurately is essential for any DIY tiling project. Here are key considerations:
– Material Costs: Include tiles, underlayment, grout, adhesive, and any necessary sealing products. Don’t forget about tools and leveling systems if you don’t already own them.
– Waste Factor: Always purchase 10-15% more tile than your project requires to account for cuts, breaks, and future repairs.
– Labor: While this is a DIY guide, consider whether you need to hire professionals for specific tasks, like heavy-duty prep work or complex tile cutting.
– Unexpected Expenses: Set aside a portion of your budget for unexpected issues, such as subfloor repairs or additional materials due to miscalculations.
Design Advice
– Tile Selection: Choose tiles that complement the room’s size and natural light. Larger tiles can make a small room appear bigger, while textured tiles add slip resistance in wet areas.
– Grout Color: Select a grout color that contrasts with your tile for a striking effect or one that blends in for a seamless look.
– Layout Patterns: Consider different tile patterns, such as herringbone or staggered, to add visual interest to your space.
Materials and Tools
– Materials: Schluter Ditra underlayment, Schluter All-Set mortar, tiles, spacers, grout, and Schluter edge profiles for transitions.
– Tools: Notched trowel, tile cutter or wet saw, rubber float, mixing paddle, bucket, level, tape measure, chalk line, and knee pads.
Preparing the Space
- Remove Baseboards: Carefully remove baseboards and trim to make room for tile and underlayment.
- Clean and Level the Subfloor: Ensure the subfloor is clean, dry, and level. Fill in low spots with a leveling compound and sand down high spots.
Video Link-
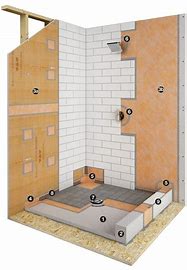
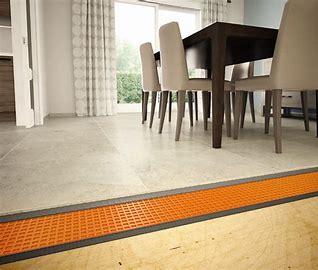
Installing Underlayment
- Cutting Schluter Ditra: Measure and cut the Ditra underlayment to fit your room, allowing for a 1/4 inch expansion gap around the edges.
- Applying Schluter All-Set: Mix the All-Set mortar following the manufacturer’s instructions. Apply it to the subfloor using a notched trowel, then place the Ditra matting on top, fleece-side down. Press it firmly into the mortar.
- Sealing Seams: Use the same mortar to seal the seams between pieces of Ditra, ensuring a continuous waterproof layer.
Product Link-
Planning Your Tile Layout
- Find Your Starting Point: Identify the most visible part of the room to start laying tiles, ensuring cuts are made in less noticeable areas.
- Dry Lay Tiles: Arrange tiles on the floor without mortar to finalize your layout, adjusting for cuts and spacing.
- Snap Chalk Lines: Use chalk lines to create a grid on the Ditra surface, aiding in tile alignment.
Video Link-
How to Square off a room for a tile floor layout. 📐 3-4-5 Triangle method (youtube.com)
Installing Tiles
- Applying Mortar: Using a notched trowel, apply Schluter All-Set to small sections of the floor, combing it out in one direction.
- Laying Tiles: Place tiles onto the mortar, twisting slightly to ensure a good bond. Use spacers to maintain even gaps for grout.
- Cutting Tiles: Measure and cut tiles as needed for edges and obstacles, using a tile cutter or wet saw.
Video Link-
How to use LASER for TILE FLOOR LAYOUT and INSTALLATION (youtube.com)
Tile Shower Wall with Leveling Clips — Layout, Installation, and Cutting Tips (youtube.com)
Leveling Systems
Leveling systems are crucial for achieving a flat, lippage-free surface, especially when working with large format tiles. These systems often include clips and wedges or screws that hold tiles at an even height until the adhesive sets.
- How to Use: After applying mortar and placing a tile, insert the clips under the edges of the tile. Place the next tile, insert more clips, and then insert wedges into the clips or tighten the screws to level the adjacent tiles. Once the adhesive is set, the clips are removed (usually by kicking or using a rubber mallet), leaving behind a perfectly flat surface.
- Choosing a System: Opt for a system that suits the size and thickness of your tiles. Some systems are designed specifically for large format tiles, while others are versatile enough to handle a range of sizes.
Product Link-
Selecting the Right Grout- Grouting and Finishing
- Applying Grout: After the mortar has set (usually 24 hours), remove spacers and apply grout with a rubber float, pressing it firmly into the joints.
- Cleaning: Use a damp sponge to clean off excess grout from the tile surface, being careful not to disturb the grout lines.
- Curing: Allow the grout to cure according to the manufacturer’s instructions before walking on the floor or sealing the grout.
Selecting the Right Grout
Grout choice is pivotal not only for aesthetics but also for the longevity and maintenance of your tile work. The main types are cement-based, epoxy, and urethane grouts.
– Cement-Based Grouts: These are traditional and widely used due to their ease of installation and cost-effectiveness. They come in sanded and unsanded varieties. Sanded grout is used for wider joints and unsanded for narrower joints. Cement-based grouts now come in rapid-setting versions, which are great for projects that need to be completed quickly, but they require a more experienced hand due to their fast curing time.
– Epoxy Grouts: Highly durable and resistant to stains, chemicals, and moisture, epoxy grouts are ideal for areas exposed to harsh conditions, like kitchens and bathrooms. While they offer superior performance, they can be more challenging to work with and clean up, making them less DIY-friendly.
– Urethane Grouts: Urethane-based grouts are relatively easy to apply, similar to traditional grouts, but offer improved color consistency, flexibility, and resistance to staining. They are a good middle ground between ease of use and performance benefits.
Video Link-
Reinstalling Baseboards and Transition Strips
- Cutting and Fitting: Cut and fit baseboards or trim to accommodate the new tile height.
- Installing Transition Strips: Where the tile meets other flooring types, install Schluter edge profiles for a smooth transition.
Final Tips
– Take Your Time: Rushing through tile installation can lead to mistakes. Allow yourself plenty of time for each step, especially if you’re learning as you go.
– Practice Makes Perfect: Practice cutting and laying tiles before starting on the actual floor. This can help you get comfortable with the tools and techniques.
– Stay Organized: Keep your workspace tidy and your materials organized. This will make the process smoother and help prevent errors.
By incorporating these detailed considerations into your planning and execution, you’ll be better prepared to tackle your tiling project with confidence, achieving a beautiful, lasting result that’s close to professional quality.
Video Link-